
Introduction
As an aspiring woodworker you will inevitably seek to increase your skill and knowledge in the area of joinery. There are many woodworking joints, some more difficult than others, of which a few stand out as being essential to the craft. In my opinion there are 7 joints that, to be an accomplished woodworker, you must become proficient at in order to produce heirloom quality fine furniture. The following list begins with the simplest joint to accomplish and ends with the most difficult. Keep in mind that this is a highly debated topic amongst woodworkers and you will likely get different answers depending on the person you ask. I developed this list based on my own experience while learning to build furniture and, to this day, am still nowhere near a master at any one of these joints. Woodworking is a craft that people spend a lifetime learning and very few gain the title of master woodworker.
It is my hope that the information you gain through this article will help you on your path to becoming a joinery wizard. If you work through each joint in this list, starting with the butt joint and ending with the dovetail, you will build the joinery skills required to produce stunning furniture pieces.
7 Essential Joints
The Butt Joint
Perhaps the simplest form of joinery is the butt joint. It is the mating of two different wood surfaces, using glue and often a mechanical fastener. This joint doesn’t require the removal of wood to be executed. Most commonly butt joints are used to join boards together for wide panels or table tops. It’s typical to reinforce butt joints with pocket hole screws, dowels, and biscuits to provide additional holding power. Although, these reinforcements are widely used they are not necessary. Modern wood glues have such holding power that the wood fibers will sever long before the wood glue fails. One variation of the butt joint, usually taught to fine woodworking students, is the spring joint. Essentially, a very small amount of wood is removed from the center of each mating board and clamping pressure is used to bring the joint together. This process creates an almost invisible glue joint. This joint variation is on the more advanced side and a little out of scope for this article.
The Half-Lap Joint
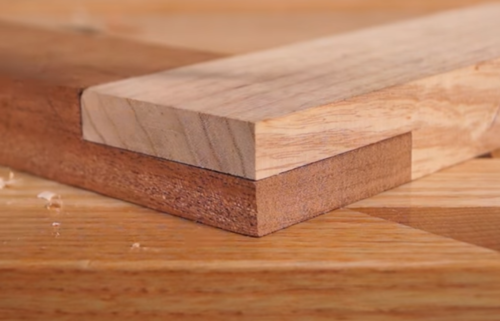
The half-lap joint is assembled exactly how the name indicates. Two pieces of lumber are joined together after each piece has half its thickness removed. The two pieces of lumber are overlapped at the points where the wood has been removed and glue is used to secure them to each other. This joint is often used to create frames for cabinet doors, picture frames, drawer fronts, and cabinet face frames. There are many ways to accomplish this joint but usually woodworkers use a table saw equipped with a dado blade. There are ways to use the table saw without the dado blade so don’t worry if you don’t have one. This joint can also be accomplished using a band saw with a tall fence or a hand saw (carcass saw, tenon saw) and a shoulder plane. Although this joint is very strong without reinforcement, it’s common to see half-laps reinforced with dowels. Holes are drilled through the joint, perpendicular to it, in at least two locations and dowels are secured in the holes with glue.
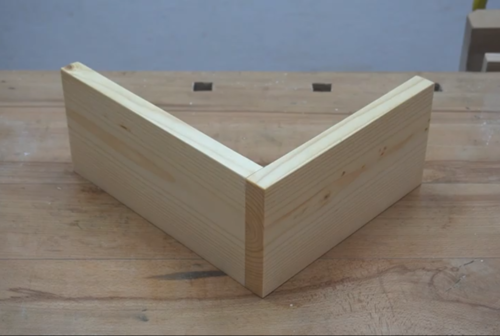
The Miter Joint
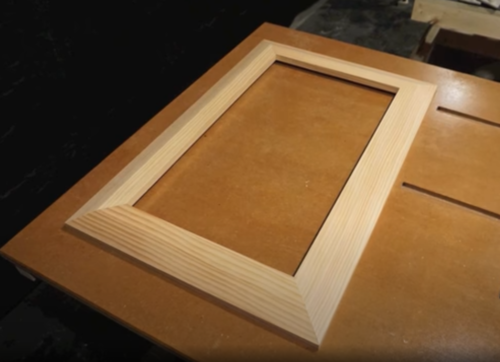
When I was starting out as a woodworker this was a joint that I struggled to learn. On its face it’s an easy joint, but executing it is a little harder than it seems. A miter joint is accomplished by joining four pieces of wood that have had a 45 degree angle cut on both ends of each piece. These angels are cut in a sequence that results in a 90 degree corner when the pieces are brought together. When all four pieces are glued, a square or a rectangle should be the result. The problem lies in cutting the 45 degree angles into each corner. Making a perfect 45 degree cut is much more difficult than it seems. Most tools that can accomplish this cut, despite how expensive they are, rarely provide a perfect cut. What happens is a multiplicative effect, meaning, the error compounds itself and by the time you go to glue the last mitered corner a gap in the joint appears. To work around this there are techniques that assist in dealing with the error. I will link to a video showing this process because explaining it is a little tricky. It’s easier to learn the process by seeing it than by reading it. If you are a hand tool user there is a method, the one that I now use, that provides for a high degree of accuracy. It involves the use of a shooting board and hand plane. I will also link to a video demonstrating this technique.
The Tongue and Groove Joint
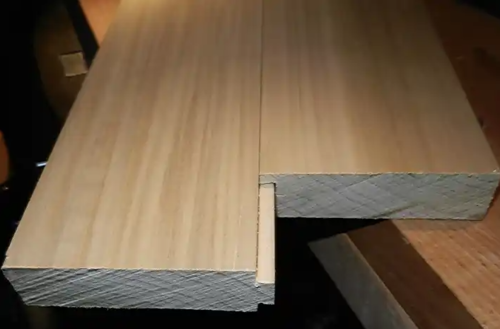
The tongue and groove joint is sort of like a half-lap running along the edge grain of a piece of lumber. Generally, you will see this joint in hardwood flooring, country settles, cedar bottom chests and some bookshelves. What is different about tongue and groove joints is they are typically assembled without glue and with minimal to no fasteners. Most woodworkers use this joint to compensate for situations where wood movement is likely and using glue would result in a joint failure. In my experience, boards that have had tongue and grooves machined into them are sandwiched within a frame allowing for them to be held in place and also move with seasonal expansion and contraction of the wood fibers. To create this joint a table saw and dado blade are used most often. There are also special tongue and groove router bits that are designed specifically to create tongue and grooves. If you’re more of a traditionalist a plow plane or combination plane can be used, in conjunction with tongue and groove blades, to create this joint.
The Box Joint
Also known as a finger joint, the box joint is very strong and one of the more decorative joint options on this list. It consists of a varying number of interlocking fingers that nest inside one another. What makes this joint so strong is the incredible amount of glue surface that exists. The nesting fingers allow for 3/4’s of the available surface area on each finger to be glued directly to the surfaces of adjacent fingers. The only part of each finger that remains unattached is the end grain. Given that end grain glue joints are notoriously weak this isn’t a bad thing. There are several ways to create a box joint, by hand (using hand saws, coping saw, and chisels), with a table saw and dado blade, on a router table using spiral bits and a jig, or on the table using a commercial jig. I have also seen some pretty innovative shop built jigs as well. There are a couple of pretty prominent YouTubers that created a few. Mostly, this joint is used in making drawers for furniture pieces and in jewelry/keepsake box construction. I have even seen a box jointed live edge bench made with reclaimed barn wood and slabs.
The Mortise and Tenon Joint
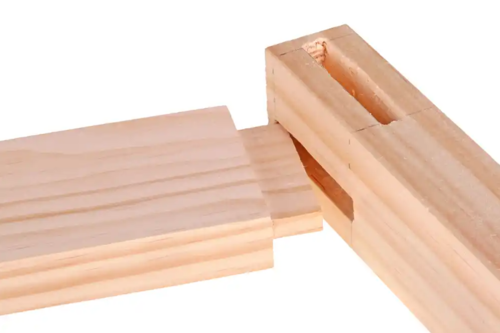
Depending on what type of mortise and tenon you are executing this can be one of the more forgiving joinery methods. It’s created by removing a portion of wood from all four sides of a piece of lumber, usually at one end, and recessing what is left in another piece of lumber. Typically, the entire recessed piece is out of view once the joint is assembled. Being assembled this way allows for some error in fitting the joint. Since you don’t have to worry about any part of the tenon being seen, incredible accuracy isn’t necessary. If the tenon fits inside the mortis relatively well, glue will make up for any issues that might be present. Some woodworkers use this joint as a decorative element in their furniture. Usually, the mortise extends all the way through one piece of lumber and the tenon is either proud of the surface or flush with it. You will often see chamfers on the edges of the protruding tenons, or wedges used to both strengthen the joint and as a decorative element when the tenons are flush. Mortise and tenons are most useful when assembling chests of drawers (the frame), attaching stretchers to legs, and when adding breadboard ends to tabletops. The mortise and tenon joint can be accomplished using a table saw with a dado blade and router with a spiral bit, this is how most wood workers do it, or you can go the traditional route and use a hand saw and chisels. Specialty chisels exist for this specific joint, they are referred to as mortising chisels. Additionally, powered mortisers can be purchased to accomplish the mortise portion of this joint.
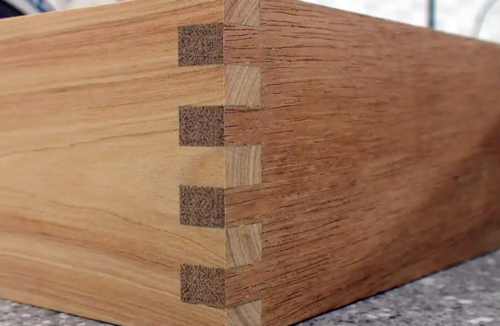
The Dovetail Joint

The dovetail joint is likely the most iconic joint that exists in the realm of woodworking. It derives its name from an actual dove’s tail because of its resemblance to the bird’s tail feathers. Typically, a dovetail is used in case work and drawer joinery but there are many applications where this joint can be useful. There are two terms to be aware of with this joint, pins and tails. The tails of a dovetail joint are what you probably expect, the fan like wedge of wood that exists after removing waste wood from between each tail. The pins are the mirror opposite of the tails, the wedge of waste wood removed to make the tails is left behind and wood in the exact shape and depth of the tail is removed revealing the pins. I know that was probably confusing a little so my suggestion would be to dive a little more into this topic by researching images of the joint to better understand it. There are many ways to produce this joint and even more methods that have been developed. Most commonly this joint is produced either by hand, with a dovetail saw, dovetail marker, and chisels, or with a manufactured jig. There are methods that utilize a band saw and table saw to create this joint but it requires you to create a few templates and a sled to make it happen. I will link to a video that demonstrates this technique below. To give you a preview of the rabbit hole you can fall down when exploring this topic, there are several variations of the dovetail joint. The through dovetail, half-blind dovetail, sliding dovetail, mitered dovetail, houndstooth dovetail, and half-blind houndstooth dovetail are just a few of the options you have. This topic can get in-depth and the learning curve to being proficient at this joint can be steep. My suggestion is to get proficient at using a handsaw and chisels before attempting to make on of these. Developing those two skills first will accelerate your ability to make this beautiful and iconic joint.
Conclusion
I hope that this article helped you on your journey to becoming a better woodworker by exposing you to some of the types of joinery that are possible while woodworking. There are many types of joints that can be made and I barely scratched the surface with this article. If this information was a little rudimentary for your current skill level then I suggest looking into the wonderful world of Japanese joinery methods. The Japanese people are some of the most skilled joiners I have ever seen. They can literally build entire structure using joinery alone without mechanical fasteners. Its incredible. If you found this article helpful and would like to support my efforts I would love it if you chose to share this article with your fellow woodworkers on social media. I’ve also included a bunch or affiliate links below for tools that can be used to achieve the joints in this article. Thanks for reading and good luck.
Tools


